Rahul Raoniar
- posted on
- Comments Off on Setting Up IPython Notebook using Anaconda Distribution

Anaconda is a free and open-source distribution of the Python and R programming languages for scientific computing (data science, machine learning applications, large-scale data processing, predictive analytics, etc.), that aims to simplify package management and deployment [Wikipedia].
I’m a python and R user by heart. I personally like the anaconda distribution because of its library/package management capabilities. At the beginning of my python journey, I was able to download and install the Anaconda package smoothly. The problem started when I started playing around the environment and setting up the IPython notebook.
I know anaconda environment setting is pretty easy. You can find the code just searching it on google. It can be done with one line of code. “But problem starts when you want to link that environment to Jupyter notebook kernel name”. Even when you messed up some library and want to freshly create a new kernel specification and name by removing the old one.
Now, you will be wondering, thinking that I can do that by just searching the web, yes you can do that but this would take time if you are new to Anaconda. After experimenting with lots of available code I have come to a conclusion that sometimes it works and sometimes it doesn’t. The time it won’t work for you, you start to feel the frustration for sure.
I’m currently writing this so that one doesn’t have to go through the same search + frustration stage.
Article outline
- Creating a virtual environment
- Activating environment
- Linking environment to IPython Kernel
- Listing all environment names
- Removing an anaconda environment
- Listing all IPython Kernel names
- Removing kernel name
Let’s assume that you have downloaded and installed Anaconda Distribution in your operating system.
Creating a Conda Environment
After installing Anaconda. The next step is to create a new virtual environment. First, search the Anaconda Prompt in the start menu and open it. You can create an environment with the following code. Just supply the yourenvname with your preferred environment name. You can set the python version too. Here, I have set the python version to 3.6.
conda create --name yourenvname python=3.6Activating Conda Environment
Before you start installing packages you should first activate the environment using conda activate your_existing_environment_name. Once activated you can see the environment name instead of basename inside the brackets.
conda activate yourenvname
Installing Ipykernel
The IPython kernel is the Python execution backend for Jupyter. The Jupyter Notebook automatically ensure that the IPython kernel is available. However, if you want to use a kernel with a different version of Python, or in an anaconda environment, you’ll need to install that manually. So, the next step will be to install the ipykernel using pip.
pip install ipykernelConnecting the kernel to the existing environment
The next step is to connect the kernel to the existing anaconda environment so that you will be able to access the environment inside your IPython notebook. In the following code, you need to modify the yourenvname with your existing conda environment name. and “display-name” with the name you want to display inside your IPython Notebook. Usually, the ipykernel name is set to the same name as conda environment name for convenience.
python -m ipykernel install --user --name yourenvname --display-name "display-name"Removing a Conda Environment
If you have a large number of environment you can list the environment name using the following code: conda env list. Once you know the exact name of your environment that you want to remove you can proceed for the removal process.
conda env list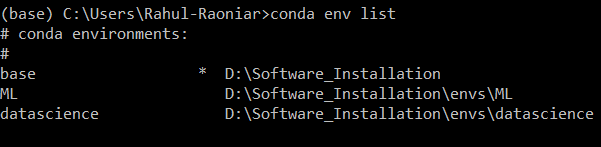
In order to remove an environment, you can supply your existing environment to the following code in the yourenvname place
conda env remove -n yourenvnameRemoving a kernel
Even if you remove an anaconda environment still the name linked to Ipython kernel will be displayed. So the next step would be to remove it from Jupyter kernel list.
First, check whether the removed environment linked to IPython kernel spec still exist with the following code.
jupyter kernelspec list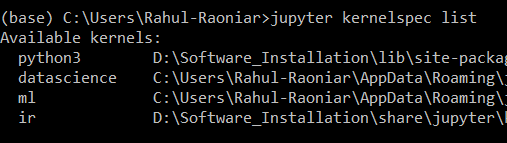
If it still exists in the kernel specification list then you can remove it from the kernel spec using the following code. Just supply the kernel spec name <kernel_name>
jupyter kernelspec remove <kernel_name>This is the step by step process for setting up your anaconda environment and IPython notebook.
I hope you learned something new. See you next time!
Featured Image: Photo by Safar Safarov on Unsplash